You open the door to your pantry unit and feel that familiar pang of frustration. Canned goods are stacked haphazardly, spices are scattered across multiple shelves, and you can never find what you’re looking for when you need it most. If this sounds familiar, you’re not alone. A well-organised pantry can completely change your cooking experience from chaotic to seamless, and the good news is that achieving pantry perfection is easier than you think.
Let’s walk through a comprehensive step-by-step process that will turn your pantry chaos into organised bliss.
Step 1: Empty and Assess Your Space
Start fresh by removing everything from your pantry. It may feel overwhelming, but this gives you a clear view of your space. As you empty each shelf, check for expired items and duplicates hiding in the back.
Take the time to clean all surfaces thoroughly. Wipe down shelves, vacuum crumbs, and remove any sticky spots or stains. This is also a great chance to inspect your pantry unit for any maintenance needs.
Look at the layout with fresh eyes. Notice the height between shelves, depth of storage areas, and any awkward or hard-to-reach corners. Understanding these details will guide your organisational decisions in the following steps.
Step 2: Categorise Your Inventory
Group all your pantry items into logical categories. Start with broad categories like baking supplies, canned goods, snacks, breakfast items, and spices. Then create subcategories within each group. For example, separate your baking supplies into flours, sugars, extracts, and decorating items.
This categorisation process will reveal patterns in your food storage habits and help you understand how much space each category requires. You might discover that you have three opened boxes of baking soda or realise you’ve been buying the same pasta sauce repeatedly because you couldn’t see what you already had.
Don’t forget to consider frequency of use during this categorisation phase. Items you reach for daily should be treated differently from specialty ingredients you use only occasionally.
Step 3: Plan Your Shelf Strategy
Now that you understand both your space and your inventory, it’s time to assign categories to specific areas of your pantry. The key principle here is accessibility. Items that you use most frequently should be at eye level and within easy reach.
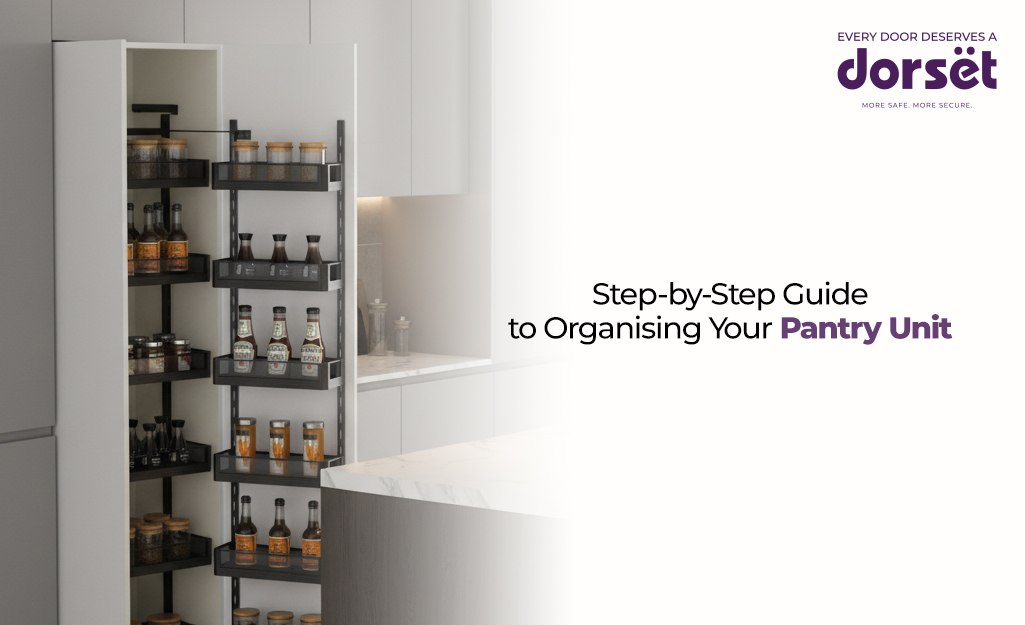
For pull-out pantry systems, like the Dorset bottle pull out, take advantage of the full extension capability by placing frequently used sauce bottles and jam jars toward the front of each shelf level. This makes sure you can grab what you need without having to pull the unit out completely every time.
Reserve the highest shelves for items you use infrequently, like special occasion serving pieces or bulk purchases. Lower shelves work well for heavier items like large containers of oil or bags of flour, but make sure these areas remain accessible for daily use.
Step 4: Implement Vertical Storage Solutions
Make the most of your pantry’s vertical space by thinking in layers. Use shelf risers to create multiple levels within each shelf, effectively doubling your storage capacity. This is particularly effective for canned goods and jarred items where you can see labels at a glance.
Door-mounted storage can be incredibly valuable, especially in a narrow pantry unit. Use the inside of your pantry door for frequently accessed items like spices, condiments, or cooking oils. Just make sure the door can still close properly with your chosen storage solutions in place.
For deeper pantry units, consider using sliding organisers or lazy susans that bring items from the back forward with a simple rotation. This prevents the “black hole” effect where items disappear into the depths of your pantry.
Step 5: Choose the Right Containers
Invest in a variety of airtight containers for dry goods like cereals, pasta, rice, and baking ingredients. Clear containers allow you to see contents and quantity at a glance, while airtight seals keep everything fresh longer.
Choose containers that fit your space efficiently. Rectangular containers typically use space more effectively than round ones, and stackable designs help maximize vertical storage. Make sure your containers fit comfortably on your shelves with enough clearance to remove lids easily.
Label everything clearly, including expiration dates where relevant. Even if containers are transparent, labels help other family members maintain your organisational system and make restocking much easier.
Step 6: Create Zones for Different Needs
Establish specific zones within your pantry based on how you use items. Create a “quick grab” zone at eye level for everyday essentials like coffee, tea, and frequently used spices. Designate a baking zone where all your baking supplies live together, making it easy to gather everything you need for a recipe.
Set up a snack zone that’s easily accessible to family members, perhaps at a lower level where children can reach healthy options independently. Create a meal prep zone with items you use for weekly meal preparation, keeping them together for efficiency.
If you have a dual-access pantry system, consider dedicating each side to different types of items, perhaps one side for dry goods and baking supplies, and the other for canned goods and condiments.
Step 7: Optimize for Your Cooking Style
Organise your pantry to match how you actually cook, not how you think you should cook. If you’re a frequent baker, give baking supplies prime real estate. If you rely heavily on one-pot meals, group your cooking basics together for easy access.
Consider creating “recipe kits” for meals you make regularly. Store all the pantry ingredients for your go-to curry or favourite stir-fry in a designated area or container, making meal preparation much more efficient.
Step 8: Implement a Maintenance System
Establish a routine for maintaining your organised pantry. Do a quick tidying session weekly, returning items to their designated spots and checking for any supplies running low. Monthly, do a more thorough review, checking expiration dates and reorganising any areas that have become cluttered.
Create a running grocery list that corresponds to your pantry organisation. When you notice you’re running low on items in your baking zone, add them to the appropriate section of your shopping list. This systematic approach prevents both over-buying and running out of essentials.
Involve family members in maintaining the system by clearly labelling zones and establishing simple rules about where things belong. The easier your system is to understand and follow, the more likely it is to stay organised long-term.
Conclusion
An organised pantry is an investment in your daily quality of life. When everything has a designated place and you can find what you need quickly, cooking becomes more enjoyable and meal planning becomes more efficient. The key to long-term success is creating a system that works with your natural habits rather than against them.
With a Dorset pantry unit, you can achieve this level of organisation very easily. Its modular design, pull-out systems, and smart storage solutions make it easy to create zones, optimise vertical space, and keep everything in order. Upgrade your pantry today and enjoy a kitchen that’s not just functional, but truly inspiring to cook in.